What is the best brine shrimp hatchery?
What is the best brine shrimp hatchery?
As we all know, the nutritional value of brine shrimp is one of the best. Many aquarists think that hatching brine shrimp is too troublesome, but with our UUIDEAR brine shrimp incubator, you will feel that hatching brine shrimp is a very simple and enjoyable thing.
Let me introduce the UUIDEAR DIY brine shrimp hatchery with details at below:
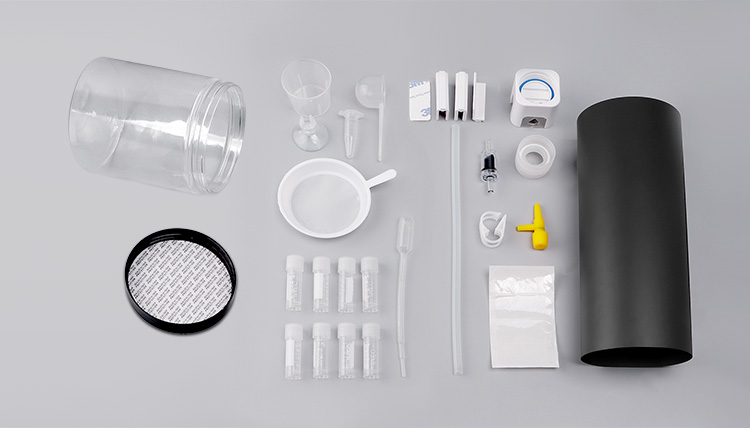
1. UUIDEAR brine shrimp hatchery kit accessories
Incubation kit
Bottle adaptor, incubator base and slot, check valve, air flow regulator, tubing clamp, airline tubing.
Collection kit
Collection cup, filter, mini feeder, suction cup, pipette, storage bottle, measuring spoon, measuring cup, sticker, masking film.
2. Brine shrimp hatchery diy instruction
Step 1. Prepare a 1.5L water bottle, cut 3cm from the bottom
Step 2. Choose the right adaptor according your tank wall thickness, the adaptor can be used from 3-10mm tank wall.
Step 3. Cut the air hose into 2 pcs, each 4cm, install the hatchery as the picture show, closed situation
Step 4. Put the sticker on the bottle body, and add 1200ml fresh water.
Step 5. Add 2 scoop sea salt, and 1.5 scoop shrimp eggs.
Step 6. connect with air pump and open the air valve, supply air for 24 hours, water temperature 25-28℃, if needed, combine use a heater to keep the right temperature.
Step 7. Roll and air supply to ensure fresh and high quality shrimp and improve hatching rate.
Step 8. Put the masking film on the bottle, shrimps live together in the bottom as the phototaxis. Shrimp shells will rise to the surface, it is easy to collect the shrimps.
Step 9. Turn off the air pump and the air valve, let stand for 15 minutes you can see the shrimps in the bottle bottom.
Step 10. Open the hose clamp and collect the shrimps in the storage bottle.
Step 11. Wash the salt by brine shrimp sieve net
Step 12. Collect the brine shrimp into the storage bottle, freeze in the refrigerator and feed anytime.

3. F & Q about brine shrimp incubators
1. Advantages of our brine shrimp hatchery compare with hanging incubator
Hanging incubator need more space, tilt will affect the hatching rate and doesn’t look good.
UUIDEAR Brine shrimp hatchery more easy diy, directly stuck to the tank wall, fit 3-10mm thickness tank, no tilt and no harm to the tank.
2. How to separate the brine shrimp eggs and shells?
Provide the suitable environment, put the masking film and stop air supply 15 minutes, brine shrimp will go to the bottle bottom as phototaxis, you can see the live shrimps, shells will rise to the up. Incubator with air pump much better than shallow dish incubation, which is not good to separate eggs and shells
3. Sink eggs
Low quality eggs are sink eggs, low hatching rate and the eggs are not live. You can know the eggs good or not from the hatching rate. Our brine shrimp hatchery hatching rate above 95%
4. What is shallow dish incubation?
Prepare a water cup, add enough water and set a right temperature according the demands, 28℃, we don’t suggest this way, the hatching rate very low!
5.What is the right temperature?
28 ℃ is the best temperature for the shrimps eggs, don’t over 30℃, you cannot get more shrimps from high or low temperature, or extension of time
5. How to set the air pump?
Fill up the shrimps and roll them
7. How to store brine shrimp egg?
Brine shrimp eggs must store in the refrigerator under -0℃. we store the shrimps eggs in the -15℃ cold storage, it keep 2 years. But 10-15 days warranty if in the normal temperature
8. Why the hatching rate reduce after cold store?
Unfreeze 2-3 hours, hatching rate will be back.
9. Can brine shrimp be farmed?
Yes, but our brine shrimp cannot be farmed as it only has 48 hours life after hatching.